In Office 2010, Microsoft made it easier to customize the Ribbon. If you don’t like jumping around to the different tabs on the Ribbon to access commands, you can create a new tab and add the commands you use most to it. You can also arrange the commands on the new tab into groups to make them even easier to find. In Office 2016, the overall method for customizing the Ribbon is the same, with a few small tweaks.
Add a Custom Tab to the Ribbon in Office 2016
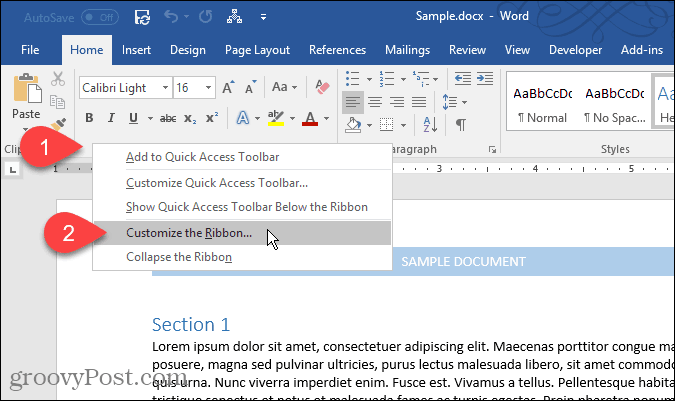
We’re going to add a custom tab in Word 2016, but the process is the same for the other Office programs and in Office 2013. This works for Excel 2016 and Outlook 2016, too. If you’re running Office 2010, read this step-by-step tutorial for the steps in that version of Office. Open an Office program and right-click on the Ribbon. Then, select Customize the Ribbon on the popup menu.
The Customize the Ribbon and keyboard shortcuts screen on the Word Options dialog box displays. There are many ways to customize the Ribbon. For the default tabs and commands already on the Ribbon, you can hide the tabs and move groups around on the tabs. You cannot add commands to existing tabs or move commands around on the tabs. However, you can add custom tabs to the Ribbon, on which you can add commands to a group, change the order of the tabs, add new tabs, create new groups on a tab, and change the order of the groups on a tab. By default, the Main Tabs are shown in the list on the right. These are the tabs you see all the time. There are also Tool Tabs, which are specialized tabs that only display when certain types of content are selected, like a table or an image. The Customize the Ribbon drop-down list allows you to choose which type of tabs to show in the list, or to show both types. For our example, we’re going to create a new custom tab, add a second group to the tab (one is created by default), and add commands to the groups. To begin, click New Tab below the list of tabs on the right.
Rename Tabs and Groups
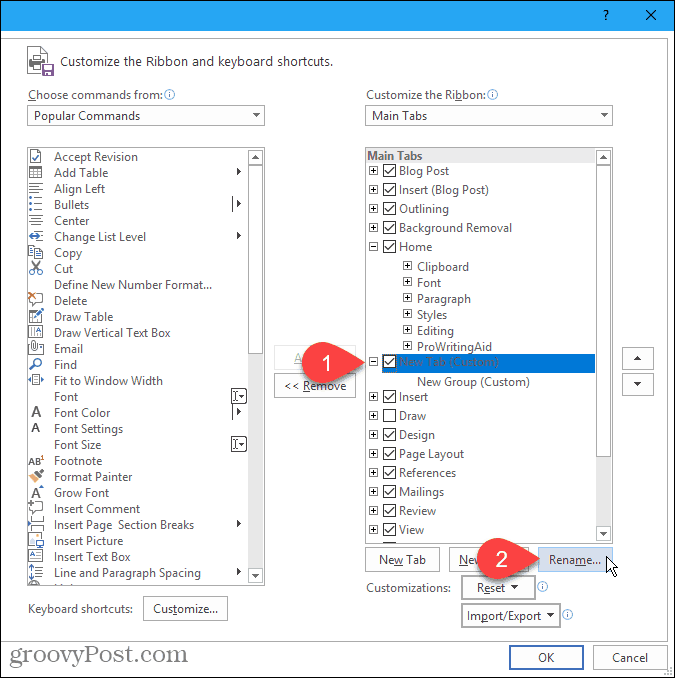
By default, the new tab is named New Tab. Let’s assign it a better name. Select the tab in the list and then click Rename. You can also right-click on the tab name and select Rename from the popup menu.
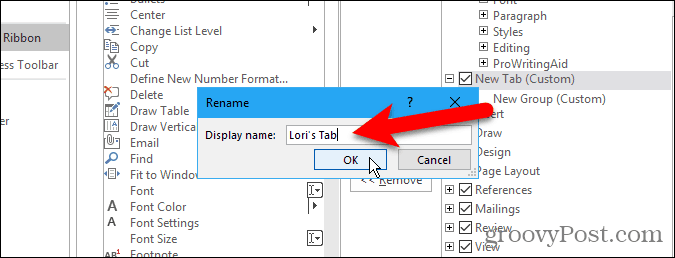
Enter a new name for the tab on the Rename dialog box and click OK.
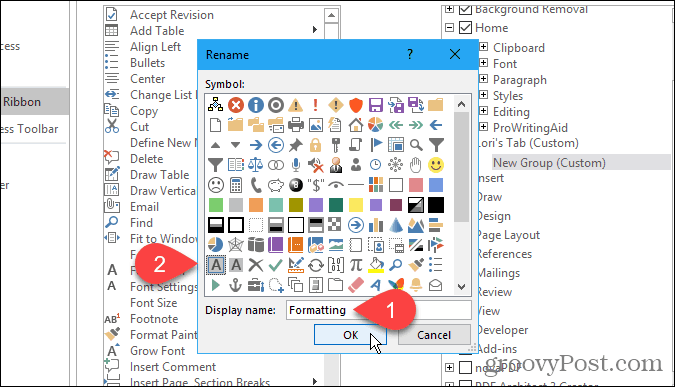
Each tab must have at least one group on it, so a group is automatically added to your new tab. Let’s rename that group. Select the group and click Rename, like you did for the tab name. You can also right-click on the group name and select Rename from the popup menu. The Rename dialog box for groups is a bit different. In addition to entering a new name in the Display name box, you can also select an icon for the group in the Symbol box.
The icon you select on the Rename dialog box for a group is used if you add the group to the Quick Access Toolbar for one-click access. To add a group to the Quick Access Toolbar, right-click on the group name and select Add to Quick Access Toolbar from the popup menu.
Add Commands to a Custom Tab
Now, let’s add some commands to the tab. Commands are only added to groups on the tab. That’s why each tab must have at least one group. To add a command to the group on your new tab, select a command in the list on the left and click Add. If you don’t see the command you want, select All Commands from the Choose commands from drop-down list above the commands list.
Add a New Group to a Custom Tab
As we mentioned, groups help to organize the commands on your new tab. So, let’s add a second group to our tab. First, make sure either the tab name or any group on the tab is selected. Then, click New Group. Now, add commands to your groups as you see fit, just like we talked about earlier.
Rearrange Commands, Groups, and Tabs
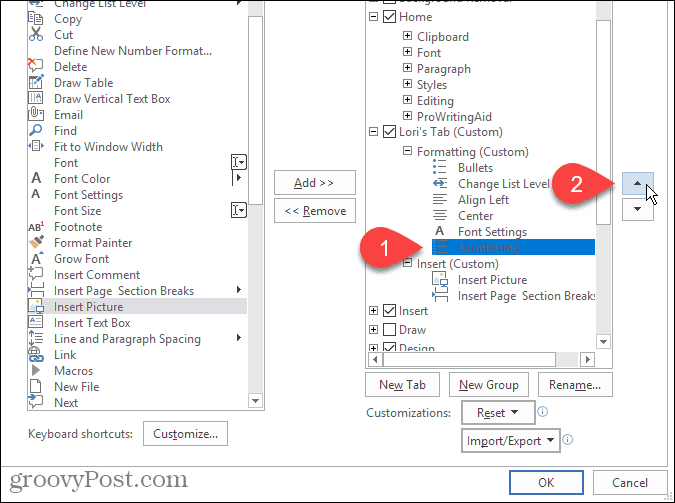
You’ve added commands to the groups on your new tab and you decide you want to rearrange them. Select the command you want to move and click the up or down arrow button to the right. You can rearrange groups on tabs the same way. You can also drag and drop a command to a different location in the same group or to a different group. You can even drag and drop a command to a group on a different custom tab. Drag and drop also works for rearranging groups on and between tabs.
You can also move tabs on the Ribbon, both custom tabs and built-in tabs. To move a tab, select the tab and click the up or down arrow to right. You can also drag and drop tabs to move them.
Use Your New Custom Tab
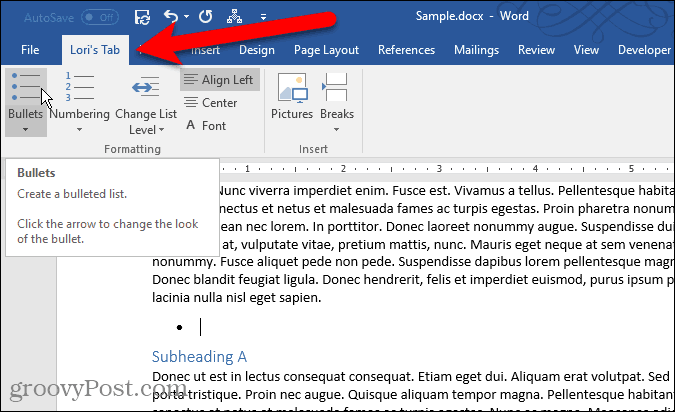
Once you’ve finished setting up your custom tab, click OK on the Word Options dialog box. You’ll see your custom tab n the Ribbon, where you can quickly access all the command you use most often.
Have you created your own custom tabs in Office? What commands have you added to your custom tabs that you use most often? Share your ideas in the comments. Comment Name * Email *
Δ Save my name and email and send me emails as new comments are made to this post.
![]()

![]()


