This is largely due to formatting. Excel files, with its cell grid structure, have to be set up in a way that allows the data to be presented without losing its layout. To save an Excel spreadsheet as a PDF, here’s what you need to do.
Setting Page Layout and Design in Excel
While page layouts and margins aren’t usually visible in Excel, they do exist. As a PDF is a document format that displays content across pages, it’s important to ensure that your Excel data can easily be displayed without the layout being broken. That’s why changing the page layout in Excel is the first thing you’ll need to do before you can save it as a PDF file. To start, open your Excel spreadsheet and press the Page Layout tab on the ribbon bar.
From here, you can determine the page margins, orientation, size, and overall print area. All four elements can impact how your Excel file is displayed when converted to a PDF. While the default page margins should be acceptable, press the Margins button and select one of the available options in the drop-down menu if you want to change them. You may do this if you want less (or more) white space around the edges of your data.
By default, Excel is set to a Portrait page orientation. If you have a large number of columns, you may wish to switch this to Landscape instead. You can do that by pressing the Orientation button and selecting one of the options available.
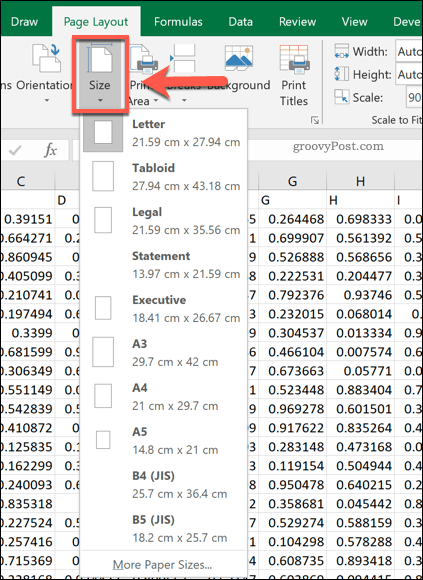
The page size will have the biggest impact on how much Excel data you can fit onto a single page. These are based on typical physical paper sizes. Press the Size button and select one of the page sizes from the drop-d0wn menu. A4 is recommended in most cases as a common size to allow for printing.
Setting Excel File Print Options
When you select a print area in Excel, you determine the cells you wish to print. Setting this also allows you to select the data you wish to save to your PDF file if you choose to print to a PDF file directly. Select the columns and rows you wish to see in your PDF file using your mouse. With the data selected, click Page Layout > Print Area > Set Print Area.
If you have a vast amount of data in your print area (for instance, with a large number of rows or columns), you can change how many of them appear on a single page. Select a number of rows or columns within your print area, then set the Width or Height options under the Page Layout > Scale to Fit section to 1 page. You can also change the overall scale percentage (the amount of space the print area will use to fill up a page) using the Scale option box provided.
You can also make further changes to your final Excel layout by pressing the Print Tiles button.
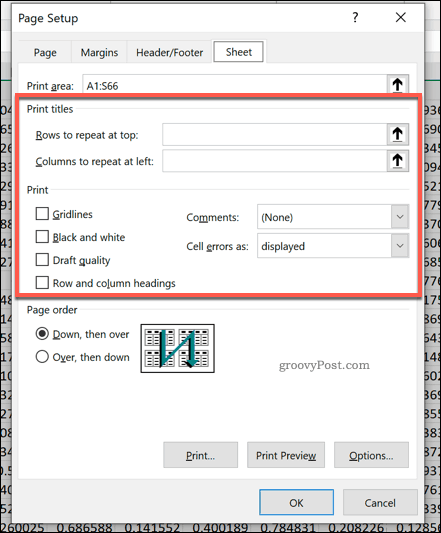
In the Page Setup window, change any of the available options listed under the Print and Print Titles sections. Any change you make will be added to your final, converted Excel to PDF document.
Converting an Excel File to a PDF
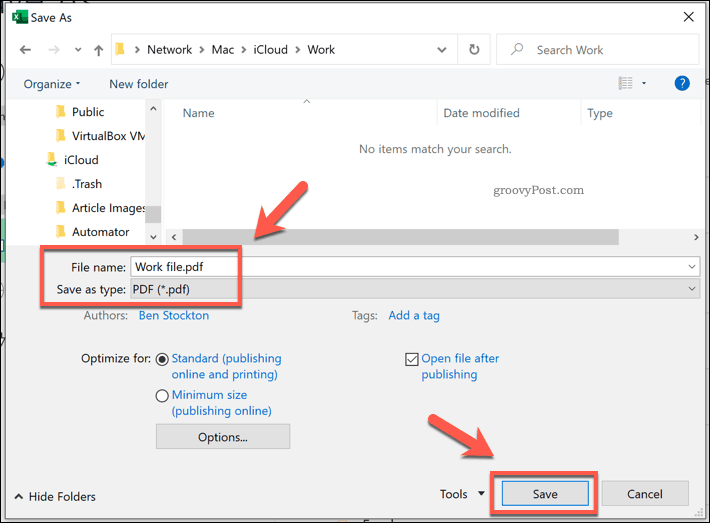
There are two ways you can convert an Excel file to a PDF. The first is to save it as a PDF file directly—to do this, press File > Save As and ensure that PDF is selected under the Save as type drop-down menu. Press Save once you’re ready.
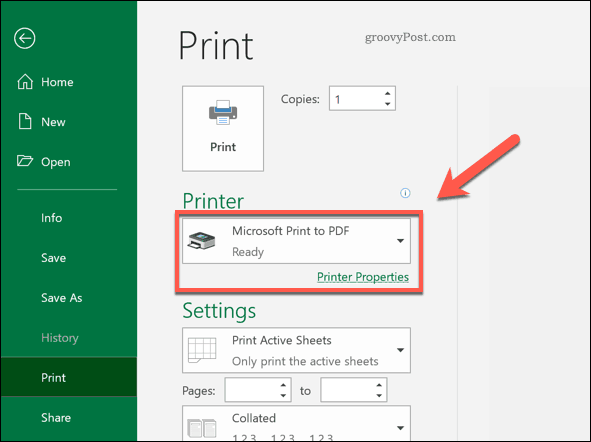
Windows users can also print to a PDF file, saving the printer output to a file rather than printing it. This will apply many of the print options above to your file and will use the print area you set. This is a good option if you only want to save some of your Excel data to a PDF file. To do this, press File > Print and select Microsoft Print to PDF from the printer list. Press Print once you’re ready.
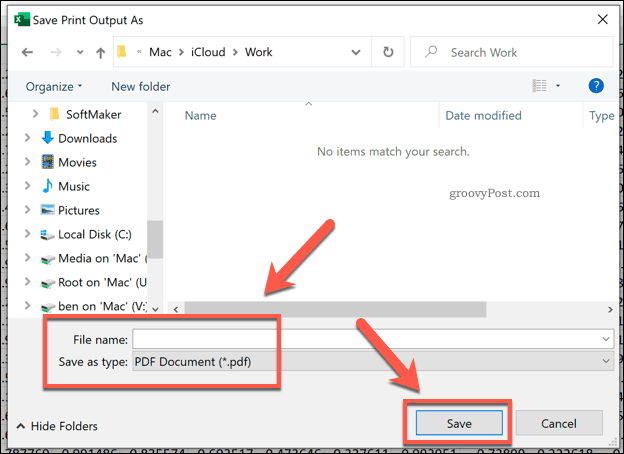
In the Save Print Output As window that appears, select where to save your file, give the file a name, then press Save to save the file.
Using Excel Data Elsewhere
Saving an Excel spreadsheet as a PDF is one way to use your Excel data in another format. It’s easy to insert Excel data into PowerPoint, as well as export it to other Office software like Word. You might also be able to copy and paste Excel data into other files and software without losing its formatting, too, although your mileage may vary.
![]()
