For a free photo organization, editing and sharing application, Windows Live Photo Gallery 2011 is fairly robust. There’s vast potential for quickly organizing and working with your photos and videos, but you may need to get a sort of workflow going to ensure that all of the requisite attributes, tags and information gets assigned to your items in the most consistent fashion. In order to get the most out of the software, it’s best to familiarize yourself with all of the features. This walkthrough will introduce you to the most basic features in Windows Live Photo Gallery 2011 and will get you started on an efficient system for organizing your photos and videos.
Importing Photos and Videos into Windows Live Photo Gallery 2011
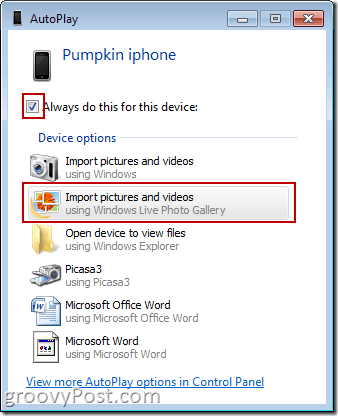
It all begins with importing photos and videos. The best way to do this, as I’ve found, is to set up your AutoPlay options to automatically pull up the Windows Live Photo Gallery “Import pictures and video” dialog whenever you plug-in your device. Nothing new here—just check Always do this for this device and choose “Import pictures and videos using Windows Live Photo Gallery” and you’re all set. (This is a little bit cumbersome with my iPhone, since it asks me to import photos every time I plug my iPhone in just to charge it. But seeing as I take a few pictures everyday anyway, it’s not a big hassle.)
If you don’t want to go the AutoPlay route, you can simply Click the Import icon in the top-left of Windows Live Photo Gallery’s Home ribbon.
Either way, it brings up this fairly familiar dialog box. You have two main choices: split up your photos and videos into groups by date and assign individual folder names and tags to each one (choose Review, organize, and group items to import) or assign them all the same tags and folder name (choose Import all items now). You can also fiddle with the destination folder and filenames by clicking More options.
In the Options/Import Options window, you can change where the imported items will be saved and alter the folder and file name. Personally, I only find this useful if you intend to save your photos on a different hard drive or partition, since you’ll be doing all of your sorting and organizing from within Windows Live Photo Gallery. Under “Other Options”, you can choose to delete files from the device after importing (you can also activate this on a case-by-case basis during when the importing dialog is open), rotate files and open Windows Live Photo Gallery after importing files.
If you have several days or weeks worth of photos on your card or camera, the option to select groups as you import is pretty handy. The slider bar on the bottom-right lets you change how many days fall between groups and you can assign different tags and folders for each one.
You can also expand each group, in case you don’t want to import every single photo that Windows Live Photo Gallery bundled into a group. If you didn’t delete photos during your last import, Windows Live Photo Gallery will notify you when you mouse-over.
Once you Click Import, it takes it from there. While waiting, you can choose to delete the photos after importing, regardless of what you chose earlier in “More options”. Be careful, though: if you erase after importing, the only copy of the photo or video will be on your hard drive.
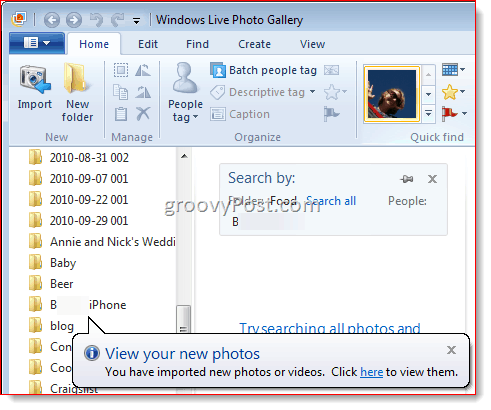
When you’re done, Windows Live Photo Gallery will kindly point out the folder that contains the items you just imported. Now, you’re ready to organize, tag, edit and share.
Organizing Photos and Videos with Windows Live Photo Gallery
The key to organizing your photos and videos effectively in Windows Live Photo Gallery is adding as much information to your items as possible. The more information, text and attributes you assign to your photos, the easier it will be to find them later with a search string. The main methods for attaching info to your photos and videos are by adding Descriptive Tags, People Tags, Ratings, Flags and Captions. You can also add or alter the Geotags, Dates and Folder Names and File Names, but if you’ve done things correctly on the front end, all of this data should already be assigned automatically. All of this information can be edited or added in the right-hand sidebar. Changes here will be applied to all selected photos or videos. Personally, I prefer to just start at the beginning of a roll and scroll through them one at a time. It’s tedious, but methodical—which in the long run, will pay off.
The People Tag feature deserves special attention, both because it’s new and it’s fairly groovy. Tagging photos works pretty much just like it does on Facebook. Click Add people tags and then draw a rectangle around a face. You can then type in a new person or choose an already known person from the list.
Windows Live Photo Gallery will take the initiative and try to detect faces before you draw them. After you start adding People Tags, it’ll be able to guess who is in the picture without any input. You can then confirm or correct it as you go. If it doesn’t know, it’ll simply ask. (P.S. As you can see from the picture, I am both a geek and a dork, unlike Mr. Groove, who is only the former.)
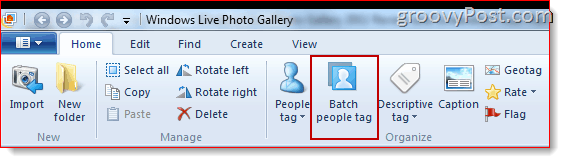
The most efficient way to get your Windows Live Photo Gallery’s face recognition chops whipped into shape is to dive right into the Batch People Tag feature. Access it by clicking its icon on the on the Home ribbon.
If this is your first time creating People Tags, the Batch People Tag window will be a little spare. So, what you need to do is ask it to pull up all the faces that it’s detected. Do so by Clicking the little Arrow next to People and choosing All detected people.
Voila! Now you have all of the detected faces pulled up as thumbnails, ready to be tagged. Select them and Right-click them to add People Tags. You can almost hear Windows Live Photo Gallery getting smarter…
Once the technology gets familiar with your friends, family and photobombers (as creepy as that seems…), Batch People Tag will be able to start making guesses across your entire collection. Click on a face in the People gallery to see a series of Windows Live Photo Gallery’s educated guesses. From there, you can click Confirm to accept its guess, Not this Person to reject it or Tag as to choose a different person. If the face is a complete stranger that you don’t care about, tell Windows Live Photo Gallery Don’t Show Again.
A half hour of this a day, and Windows Live Photo Gallery will know you better than you know yourself. Personally, I used to spend HOURS tagging all my photos (I have about 30,000 photos on my drive) so I could just type in a name and look at all the photos of a person or place. Using the facial recognition features of tools like Windows Live Photo Gallery 2011 hours, weeks and even months can be saved since you can just tag all your friends once then let the software crawl your collection matching faces. Once everyone has been tagged, you can go in and batch add the standard tags to the photos metadata. Groovy baby!
Finding and Browsing through Photos and Videos
If you are diligent and consistent in adding tags, captions and other info to your photos and videos, you should be able to browse through them and find specific photos with ease. The simplest way to do so is via the View ribbon. The gallery in the top left lets you sort your pictures by Date, Person, Tag, Rating, etc. Of course, this method of browsing through your photos and videos works the best if you’ve actually added all this information to your items.
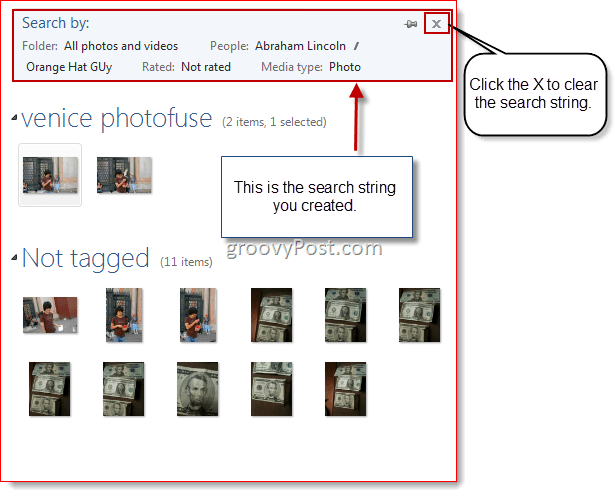
The Find ribbon brings more robust search capabilities to your photo collection. Choose the criteria by clicking the icons across the ribbon. For example, click on a person in the People gallery to limit the results to pictures that contain that person. You can select multiple people as well. Choose + And before choosing another person in order to narrow your search to photos containing both/all of the people. Choose / Or to limit your search to photos that contain any of the people you chose. You can also limits by rating, descriptive tags, media type, text searches and whether or no it’s been flagged, edited or published.
When you create a search string, it’ll be shown above your results. To clear it, Click the X in the top-right hand corner. You can remove single criteria by Clicking the X that appears when you mouse-over it.
Conclusion If you’re willing to do a little bit of gruntwork, Windows Live Photo Gallery provides numerous methods for sorting, organizing and finding your photos. The multiplicity of tags and attributes allows you to find specific photos, as well as finding custom subsets of photos (such as all five-star rated photos taken before 2008 containing Jim and Pam). The features that we covered in this post just scratch the surface of what Windows Live Photo Gallery can do. Next, we’ll cover how to edit photos, create panoramas and other groovy composites and how to share photos and videos. Also, I’ll admit, that I’ve only been a Windows Live Photo Gallery user for a couple of weeks—before, I used Picasa. So, once I get a feel for what’s hot or not about Windows Live Photo Gallery, expect a feature-by-feature review and comparison between Windows Live Photo Gallery and Google Picasa. Until next time! What you can do however is before you move over to Live Photo Gallery is click on each of the faces you have organized, select them all (1 person at a time) and add a TAG to them. This tag will be saved to the file in the meta data of the photo. When you open it in Live Photo Gallery it should be able to see that tag and you can easily search for people using tags rather than faces. Is there any way to force it to restart its facial scan/suggestion again? Have you played with it yet? What do you think? I’ll keep looking around and let ya know if I find it. Thanks What I’ll do this weekend (when I get home from work today) is I’ll search around and see if I can find a file or database inside the app that is storing the “ignored” data. If I find it i’ll let ya know. It’s a long shot but I might get lucky….? The exact same thing has happened to me. I edited pictures, once I leave the picture, it disappears and I cant find it anywhere, not even when I search for it. I’ve also looked in the recycle bin – its not there. I have found the originals in the originals folder. I must have done something wrong, because this didn’t happen from the beginning when I first started using the program? Here are two issues you may be running into Difficulty locating the original photo after it gets edited in Windows Live Photo Gallery Difficulty locating the edited photo after performing an edit to it in Windows Live Photo Gallery. This can also happen after editing metadata in the photos such as captions, ratings or tags. For issue #1 Windows Live Photo Gallery automatically saves your edits on top of the photo you’re editing. But don’t worry; you can always go back to the original version by using Revert to original. Just open the edit tab and click on it. If you want to keep both the unedited version and the edited version you can make a copy of the photo before editing it. To do so, double click on the photo, click on Make a copy and then select the location, name and extension for your copy. By default it will be stored on the same place as the original photo. Then you can edit one of the copies as you wish. If you want to access your original photos click on the dropdown below Revert to original and click on Settings. Then you can click on the link that says Go to original photos folder. You can also access this from the Options dialog. Important note: Modifying the files inside the original photos folder may break the functionality of Revert to original. We also recommend that you back-up those files if you want to keep your originals available. Hi Hi Princess, I just found this on Windows live solution centre…,I don’t know if you’re using McAfee, but I am and this makes sense… ……For issue #2 If you’ve edited a photo in Windows Live Photo Gallery (including modifying its caption, date taken, rating or tags) and the edited version disappears, check if you have McAfee installed on your computer. McAfee has confirmed that it is a known problem of their Virus Scan software that is causing the files to be marked as hidden, which prevents them from being displayed on Windows Explorer and Windows Live Photo Gallery. We recommend that you follow up with McAfee to solve the issue. You can follow the link below for more information on this as they have also provided a workaround or you can contact McAfee directly so they change the settings for you if you don’t feel comfortable doing it yourself. Here is the link: http://service.mcafee.com/faqdocument.aspx?id=TS101228 Return to your my pictures location, change the view of the page on the top right side next to the question mark symbol, there is another symbol with a drop down symbol, click it and select medium or large icons from the listed options. If you have mcafee security look into this announcement from mcafee, http://service.mcafee.com/faqdocument.aspx?id=TS101228 Report as Abuse Thanks From-camera-to-Flickr: From the memory card, I import via my laptop to Windows Live Photo gallery. The date and time are clearly displayed, and I’ve never seen a change of date/time on the photo data. The WLPG program has a built-in icon allowing the uset to upload directly to Flickr. But once I do upload the photo to Flickr, the dates and times change. I have been going back into each photo and re-entering the correct date/time, but this is obviously not the way I want to continue to deal with this. It doesn’t matter if I upload single or multiple photos at at time, the outcome is usually the same. I posted the problem in the Flickr forums, but didn’t see a similar problem. Every reply confirmed what I thought: WLPG is the problem, not Flickr. I have considered downloading WLPG again, but I’m concerned I’ll create problems with the thousands of photos I have in WLPG. If you’ve been patient enough to get this far, great. But I need some solid recommendations from people who are confident of their response. Thanks! Comment Name * Email *
Δ Save my name and email and send me emails as new comments are made to this post.


![]()
